The Omega Protocol (Ultimate) Pug Strats
With all pugs it is recommended you only join parties for your current fight experience level. For those who are new to Ultimate’s please watch/ read basic guides under the main ultimate page then apply the strats for your DC. All content and strategies provided by their respective discords. The strategies provided her are for NAUAR TOP, UAR TOP, and LPDU TOP PF parties.
Navigation
NA Datacenters: Aether, Crystal, Primal
EU Datacenters: Light – Chaos
Oceania Datacenter
NA Datacenters - NAUAR and UAR
Aether/Crystal/Primal/Dynamis
General Info and Pastebin
- This pastebin includes mitigation, sims and cheat sheets. This is NAUAR and UAR strats. All items in the pastebin are also listed below.
- Pastebin Link
Useful Macros
Waymarkers
Sims
Toolboxes
P1 Omega
P2 Male + Female
P3 Final Omega
P4 Final Omega (Echo)
P5 Delta, Sigma Omega
P6 Final Omega
Cheat Sheets
EU Datacenters - LPDU
Light - Chaos -
Mitigation and Healing Resources + Guidelines
- TOP Tank Mitigation guideline
- General Mitigation guideline (All Jobs) by the community
- Melee LB priority bible by Lars
- Tank positions by Daddy Siphem, Father of LPDU
- AST full-fight plan by Haru Misaki
- SCH full-fight plan by Dredan
Useful Macros
Full Overview Macro
/echo P1: Loop, Panto
/echo P2: BPOG full cross, right side adjusts,
/echo on F on M if NIN/SCH
/echo P3: RMTHHTMR, stacks north
/echo P4: TRHM MHRT, melees adjust
/echo P6:┏ Wave Cannon 1 ┓┏ Wave Cannon 2 ┓
/echo → ←
/echo ↓ ↓
/echo
/echo ↑ ↑
/echo → ←
/echo Meteors: WC1 but swap with Phys Ranged
/echo and and swap
Waymarkers
{“Name”:”Omega”,”MapID”:908,
“A”:{“X”:100.0,”Y”:0.0,”Z”:86.0,”ID”:0,”Active”:true},
“B”:{“X”:114.0,”Y”:0.0,”Z”:100.0,”ID”:1,”Active”:true},
“C”:{“X”:100.0,”Y”:0.0,”Z”:114.0,”ID”:2,”Active”:true},
“D”:{“X”:86.0,”Y”:0.0,”Z”:100.0,”ID”:3,”Active”:true},
“One”:{“X”:110.0,”Y”:0.0,”Z”:90.0,”ID”:4,”Active”:true},
“Two”:{“X”:110.0,”Y”:0.0,”Z”:110.0,”ID”:5,”Active”:true},
“Three”:{“X”:90.0,”Y”:0.0,”Z”:110.0,”ID”:6,”Active”:true},
“Four”:{“X”:90.0,”Y”:0.0,”Z”:90.0,”ID”:7,”Active”:true}}
Cheat Sheets
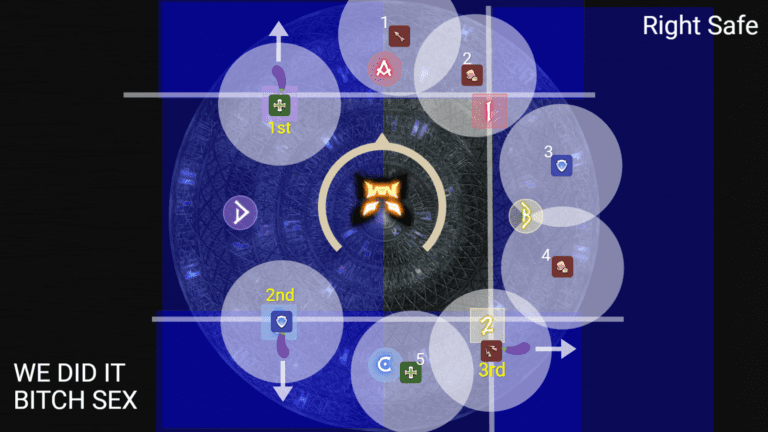
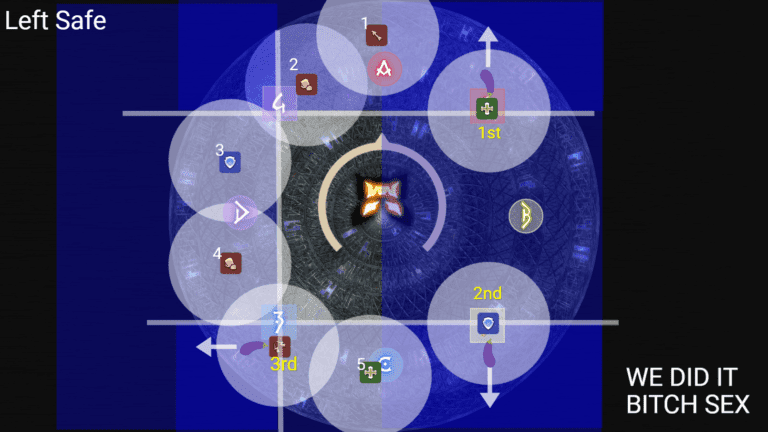
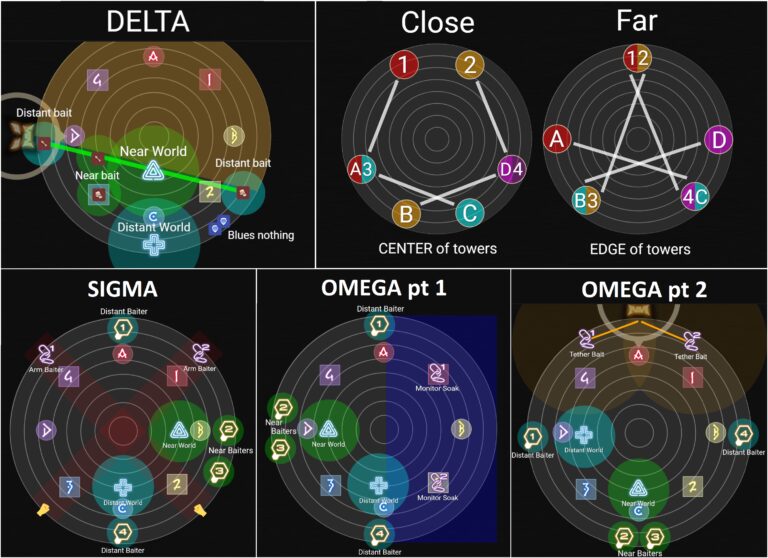
Toolboxes
P1 Omega (Beetle) (Doom Roomba)
Toolbox / Raidplan
https://raidplan.io/plan/7gDX3dkkPX1kO9u2
Prioritys
Phase 2: Omega M & Omega F
Toolbox / Raidplan
https://ff14.toolboxgaming.space/?id=502396712985961&preview=1
Prepositions

Phase 3: Final Omega
For Intermission: Healers Shield before Spreading
For P3 itself: Tank takes heavy Autos, so tanks mit properly and healer take care of your MT
Transition
https://raidplan.io/plan/46r495ZATq3kCqz1
Hello World
https://ff14.toolboxgaming.space/?id=702399575985961&preview=1
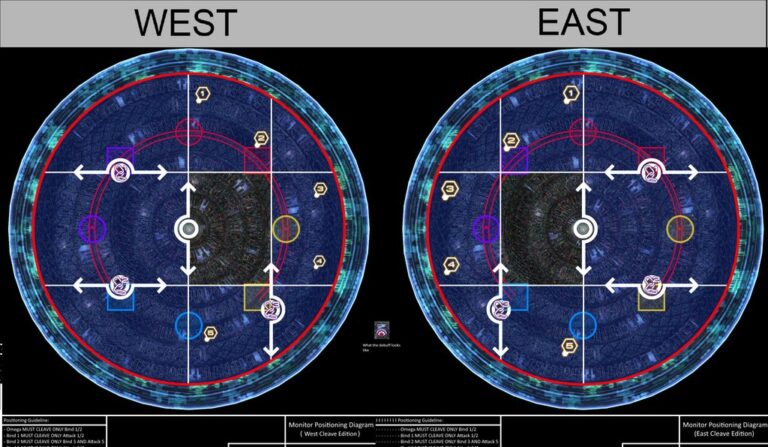
Monitors
https://ff14.toolboxgaming.space/?id=736282987145761&preview=1
Phase 4: Reboot
Toolbox / Raidplan
https://ff14.toolboxgaming.space/?id=595188367474761&preview=1
Phase 5: Dynamis Omega M & Dynamis Omega F
General Information
For 90 second cooldown raidwide mitigation (Prange, Tank) use them when the second tankbuster hit. That way you can mitigate all three big raidwides).
In PLD + GNB Setup Healers have to help the Tanks for the 3rd and 4th Tankbusters. (3rd: GNB Full -> PLD needs Help – 4th: PLD Full – GNB Needs Help).
Pulling the bosses out a bit after the tankbusters is done so that the boss teleports to the middle giving a small amount of additional time to hit them.
Toolbox / Raidplan
https://ff14.toolboxgaming.space/?id=955389449416761&preview=1
Sigma
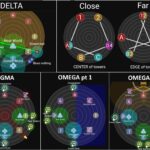
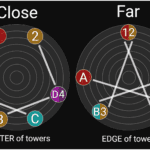
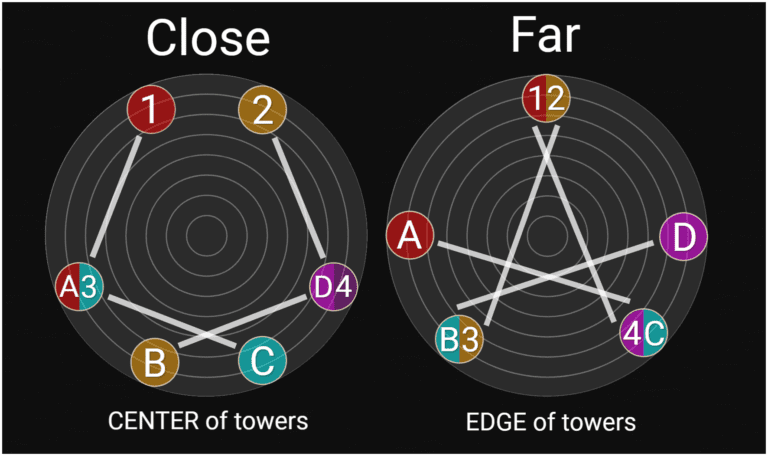
Use Macro from top-strats-vodsTOP LPDU Strats and Toolboxes For Close Glitch: Stand in the Middle of the tower For Far Glitch: Stand on the outer edge of the tower as far as possible — See cheat sheets for a clear visual summary for P5 Hello, Near/Far + Sigma towers
Phase 6: Alpha Omega
Toolbox / Raidplan
https://raidplan.io/plan/mh3bX4KJ9d8rT9nk
This is for the spreads on Wave cannon 1, Wave Cannon 2 and meteors
General Positions by Mechanic
- Cosmo Memory – Party starts in front of C after MT in between A and Middle, OT outside on sth like B (just away from party)
- Cosmo Arrow 1 into Cosmo Dive 1 – Party starts in front of 2 and starts with in/out – Party ends in front of 2 again. Tanks start on 2 as well and MT ends up close to the boss in the 4 marker direction, OT in the 1 marker direction.
- Exas 1 into Wave Cannon 1 – Stay a bit outside, see where you have to go, then group middle, dodge to the safespot and follow the exas. After that: See Raidplan on where to spread for WC1. After Beams went off, everyone stack in front of C.
- Cosmo Arrow 2 into Wave Cannon 2 – Positions and dodges are based on the marker and your role (see Raidplan) after last dodge wait for the spread beams to go off, then in front of C again.
- Exas 2 into Cosmo Dive 2 – Party will end up outside the hit box where the last Joel exploded. MT will go through the boss to the left, OT will go through the boss to the right. End position is like a Y shape.
- Meteors – WC1 Spread positions but MT and P-range swap and also H2 and OT swap (see Raidplan)
